Azure Pipelines: How to add a build agent with Azure Container Instances - part 3 : Build agent on demand
To the “Build agent on demand”
In the previous articles, we have seen how to start an additional build agent using Azure Container Instances in minutes, and then how to use our own custom build agent.
In this article, let’s see now how to create a Build agent “on-the-fly” when a build is requested, and how to destroy it right after using Azure Container Instances, Azure Functions and the agentless phase of Azure Pipelines.
Workflow for a build agent on demand
For those already familiar with Azure Pipelines, the following screenshot might be more comprehensive than words:

The important things to notice in this picture is that there are 3 phases:
- The first and the last being “Run on server”, or also called “agentless phase” because they are executed directly from
Azure DevOpsand do not require any build agent. They are calling anAzure Function, which is in charge of creating and starting / destroying our custom Build agent, hosted onAzure Container Instances. - The second phase being our usual build workflow, such as building a dotnet app, etc.
That means that by using this workflow, we really have our own “Build agent as a Service”, paying only by Build requested, and being able to scale as many as we have parallel jobs available!
Setting up an Azure Function in charge of Creating / Deleting the Azure Container Instance
You can start creating an Azure Function, directly from the Azure Portal, by following the official documentation which is the easiest and simplest way to begin.
Then to be able to interact with Azure Container Instances, we can use the Microsoft.Azure.Management.Fluent NuGet package and then modify the run.csx with the following lines :
#r "Newtonsoft.Json"

using System.Net;
using Microsoft.AspNetCore.Mvc;
using Microsoft.Extensions.Primitives;
using Newtonsoft.Json;
+ using Microsoft.Azure.Management.Fluent;
+ using Microsoft.Azure.Management.ResourceManager.Fluent;
+ using Microsoft.Azure.Management.ResourceManager.Fluent.Authentication;
+ using System;
+ using System.Collections.Generic;

public static async Task<IActionResult> Run(HttpRequest req, ILogger log)
{
    log.LogInformation("C# HTTP trigger function processed a request.");

    string name = req.Query["name"];

    string requestBody = await new StreamReader(req.Body).ReadToEndAsync();
    dynamic data = JsonConvert.DeserializeObject(requestBody);
    name = name ?? data?.name;

+     // Azure Settings
+     var tenantId = "MY_TENANT_ID";
+     var clientId = "MY_CLIENT_ID";
+     var clientSecret = "MY_CLIENT_SECRET";
+     var subscriptionId = "MY_SUBSCRIPTION_ID";
+     var resourceGroup = "MY_RESOURCE_GROUP";
+     var agentName = name;
+
+     // Azure DevOps settings
+     var imageName = "vfabing/azure-pipelines-agent-dotnet-core-sdk:latest";
+     var envConfig = new Dictionary<string, string> {
+         { "AZP_URL", "https://dev.azure.com/MY_AZUREDEVOPS_ACCOUNT" },
+         { "AZP_TOKEN", "MY_PERSONAL_ACCESS_TOKEN" },
+         { "AZP_AGENT_NAME", $"{agentName}" },
+     };
+
+     var sp = new ServicePrincipalLoginInformation { ClientId = clientId, + ClientSecret = clientSecret };
+     var azure = Azure.Authenticate(new AzureCredentials(sp, tenantId, + AzureEnvironment.AzureGlobalCloud)).WithSubscription(subscriptionId);
+     var rg = azure.ResourceGroups.GetByName(resourceGroup);
+
+     // Azure Container Instance Creation
+     new Thread(() => azure.ContainerGroups.Define(agentName)
+         .WithRegion(rg.RegionName)
+         .WithExistingResourceGroup(rg)
+         .WithLinux()
+         .WithPublicImageRegistryOnly()
+         .WithoutVolume()
+         .DefineContainerInstance(agentName)
+             .WithImage(imageName)
+             .WithoutPorts()
+             .WithEnvironmentVariables(envConfig)
+             .Attach()
+         .Create()).Start();
+
+     // Azure Container Instance Deletion
+     // new Thread(() => azure.ContainerGroups.DeleteByResourceGroup(resourceGroup, agentName)).Start();

    return name != null
        ? (ActionResult)new OkObjectResult($"Hello, {name}")
        : new BadRequestObjectResult("Please pass a name on the query string or in the request body");
}
These few lines should enable us to start a build agent on Azure Container Instances.
For the deletion of the container, create another Azure Function and comment the Creation and uncomment the Deletion part :)
You can check the file directly on a Gist
Note: The code of the
Azure Functionabove is very simple on purpose (Configuration should be better passed using Environment variables, etc.)
Note 2: You might have noticed that the creation/deletion of the container is done in a new thread. This is made to comply with
agentless jobsbeing required to finish in less than 20 seconds. In our case it is a simple way to address this prerequisites (because the agent job is “waiting” for our container to be subscribed). However if you also want to make sure that the creation of the container went alright, you should check the Callback Completion event of this task.
Then you also need to add a function.proj file to enable the restoration of the Microsoft.Azure.Management.Fluent NuGet package.
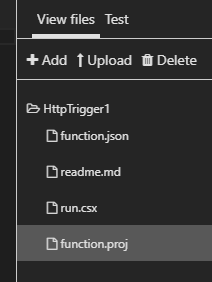
<Project Sdk="Microsoft.NET.Sdk">
    <PropertyGroup>
        <TargetFramework>netstandard2.0</TargetFramework>
    </PropertyGroup>

    <ItemGroup>
        <PackageReference Include="Microsoft.Azure.Management.Fluent" Version="1.24.1" />
    </ItemGroup>
</Project>
The content of this file is also on Gist (You can find more info about using NuGet Packages in Azure Functions on the official documentation)
Alright, so you can start to test your Azure Function directly from the Azure Portal, which should be able to create / delete the container of your build agent, and successfully be added to your Agent Pool.
Call an Azure Function from an agentless job in Azure Pipelines
Now that we have a simple way to manager our container, let’s see how to integrate it in our Azure Pipeline, more precisely at the beginning and at the end of our pipeline.
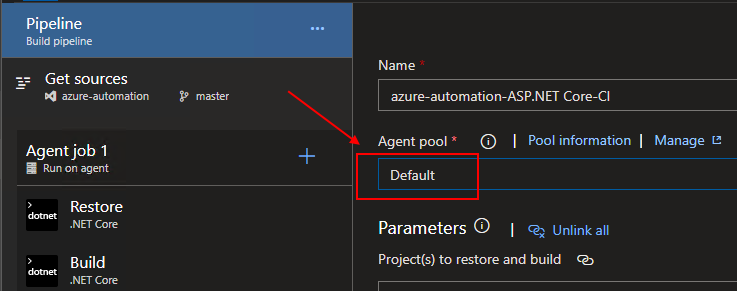
Let’s create a new Azure Pipeline, and to keep things simple, let’s use the visual designer:

After choosing the template for your application (ASP.NET Core for instance), make sure that the self-hosted agent pool where your build agent will be registered is selected.
Let’s then add 2 agentless jobs, at the start of the pipeline to create and start the container, and at the end of the pipeline to delete it, each with a Invoke Azure Function task inside.
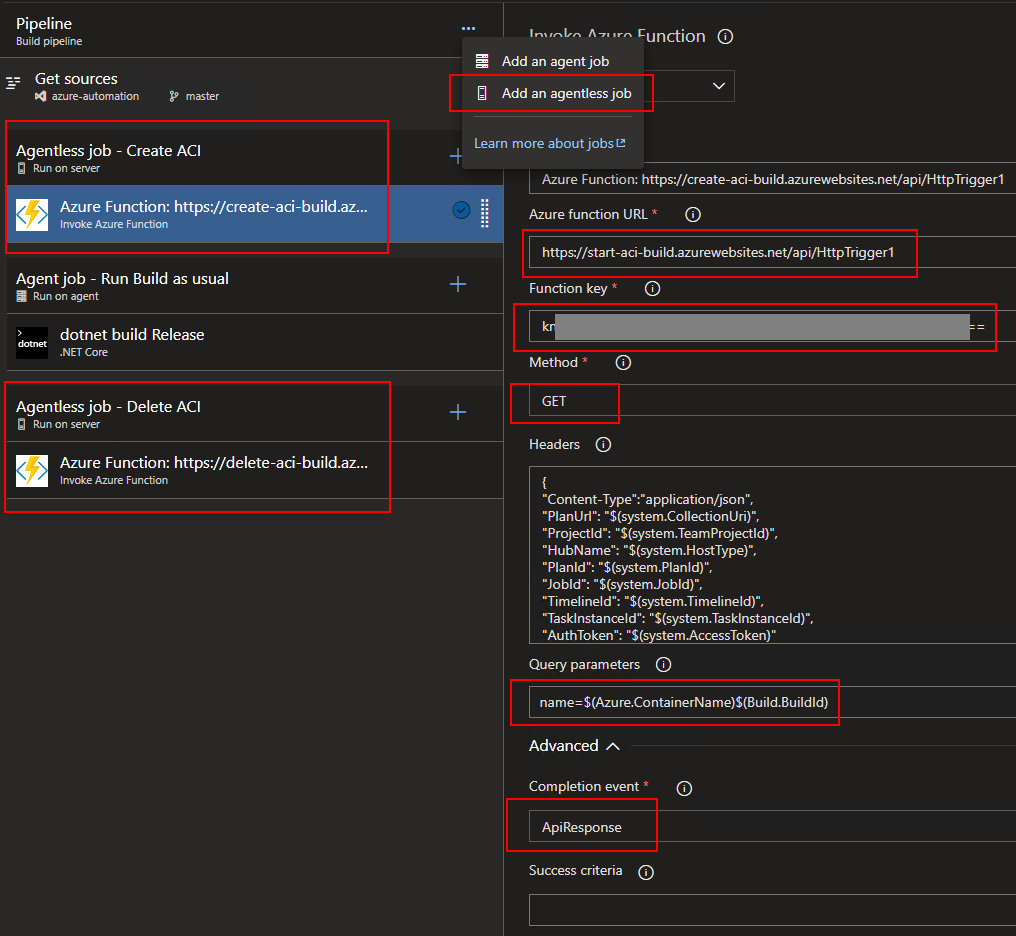
The task configuration needs:
- The
Azure function URLand theFunction keywhich can be found from the Get function URL button, - The Method
GETorPOST(Get in my example), and theContainer Namevalue passed by parameter.You can add the
$(Build.BuildId)variable to its name to make sure it is unique for every job, - The
ApiResponseCompletion event, to continue the pipeline without checking if our container was successfully started (See Callback Completion event if you want to check it also).
And that’s it! Let’s try to run our pipeline now:
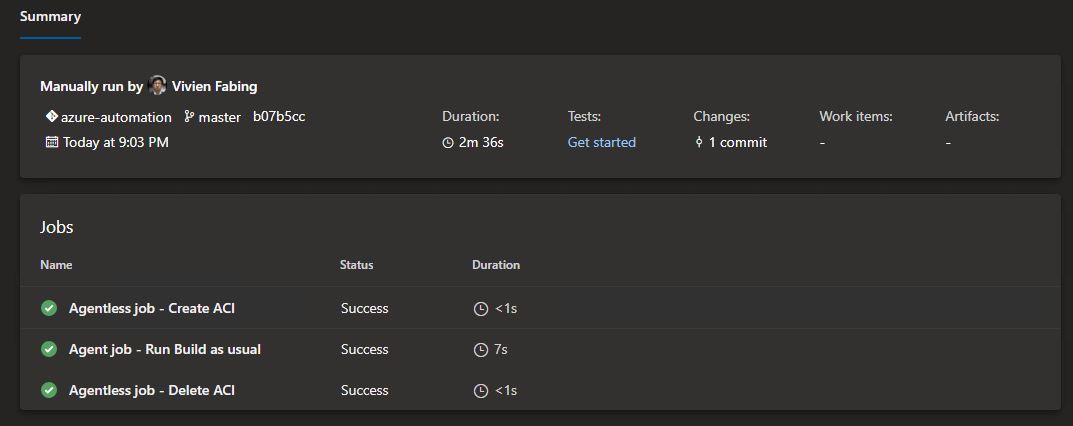
And boom, we manage to build a dotnet core application with an ephemeral build agent, for an uptime of 2m 36s, equivalent to less than 1 cent (if you check the calculation made previously)
Pretty cool isn’t it ? :)
That’s all for this Azure Pipelines x Azure Container Instances serie at the moment. If you have any feedback or any question, feel free to send me a comment or tweet.
May the code be with you!