Blazor - Part 4: How to get a Blazor PWA using Workbox
This article is part of a serie. You can jump to other articles here:
Hi everyone, this is the 4th part of my serie of articles about Blazor, and today, we will talk about getting an installable Blazor PWA (Progressive Web App) using Workbox.
If you still not have heard about it, PWA are apps which are getting closer to the look and feel of “real” desktop applications, by getting the ability to be installable, working offline, accessing to push notifications and so on.
I personally like a lot the idea of being able to provide an easy installable app on any OS (Windows, Android, iOS) without having to use different tooling, languages, etc.
To keep it simple, a PWA needs mainly 2 files :
- a
manifest.jsonfile describing our installable app (name, icons, etc.), - and a
sw.jsService Worker file to handle the offline caching, push notifications, etc.
Let’s see more in details how to add them.
Describing our installable Blazor app with a manifest.json file
Adding a manifest.json file to our Blazor app is pretty straightforward, we just need to put it in our wwwroot folder to get it published, and we also need to add a reference to this file in our index.html file.
A manifest.json looks like someone like this:
manifest.json
{
  "short_name": "blazor-workbox-pwa",
  "name": "Blazor Workbox PWA",
  "icons": [
    {
      "src": "/images/icons-192.png",
      "type": "image/png",
      "sizes": "192x192"
    },
    {
      "src": "/images/icons-512.png",
      "type": "image/png",
      "sizes": "512x512"
    }
  ],
  "start_url": "/",
  "background_color": "#3367D6",
  "display": "standalone",
  "scope": "/",
  "theme_color": "#3367D6"
}
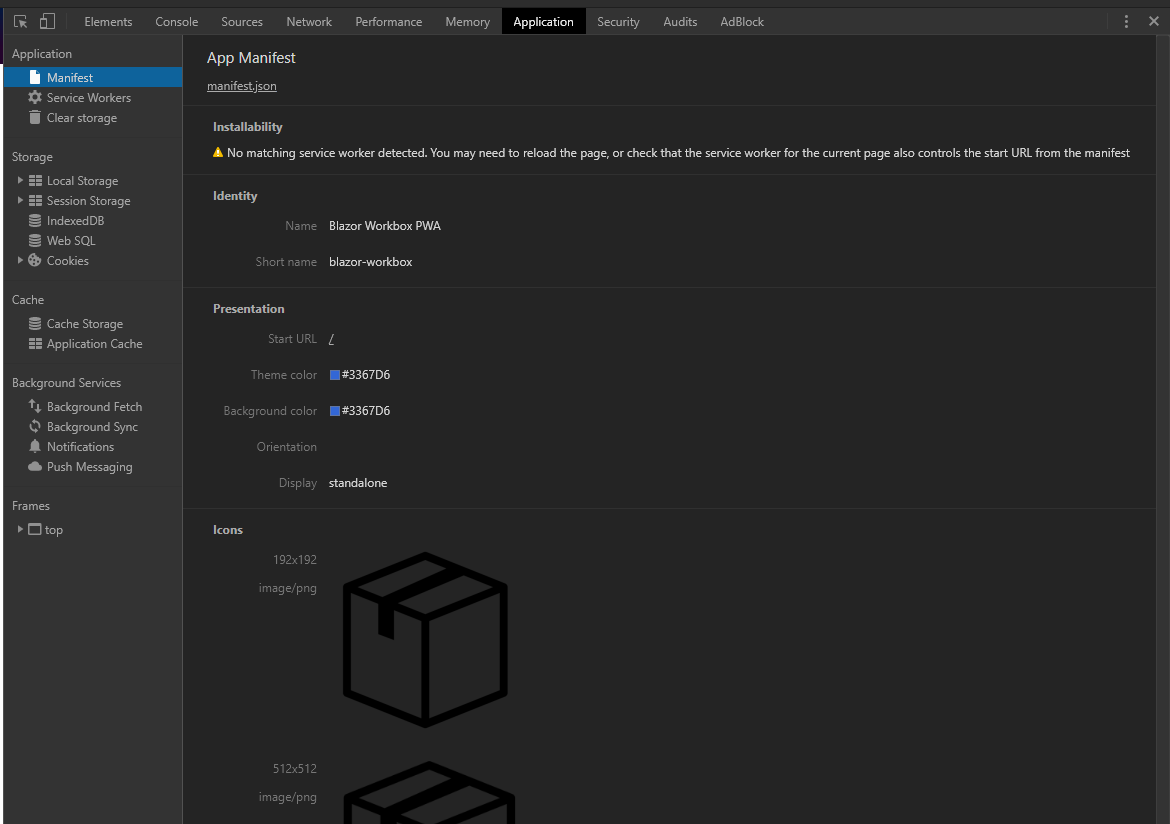
Mainly, it will enable us to define our app naming (short_name, name), cosmetics (icons, background_color, theme_color), offline start_url, etc.
Note: You can find more information here.
We also need to add some more assets such as icons, favicon, etc. to get a pretty PWA, and also add the following line in the <head> tag of our index.html file:
<link rel="manifest" href="/manifest.json">
Here is what it should look like in Chrome DevTools
Get an offline working Blazor PWA with Workbox
In addition to all the greatness I have already describe in my first article about Blazor, another one worth mentioning is that getting our Blazor app working like a standard SPA gives us access to all the standard tooling available on internet, already used by other SPA frameworks!
And frankly, one tool that I am particularly happy to have access to is Workbox.
I don’t know if you ever tried to write a Service Worker using Vanilla JavaScript, but personally it wasn’t one of my best experience in development :)
So Workbox is a popular tool (Maintained by a small company you have probably heard of haha) which, I think, simplify greatly the development of Service Workers.
In a nutshell, it is a tool which can be used in command line, and which will help us generate a Service Worker sw.js file, ready to be referenced in our index.html file.
First, we will need a workbox-config.js file like the following one:
module.exports = {
    "globDirectory": "bin/Release/netstandard2.0/publish/blazor-workbox-pwa/dist",
    "globPatterns": [
        '**/*.{html,json,js,css,png,ico,json,wasm,dll}'
    ],
    "swDest": "bin/Release/netstandard2.0/publish/blazor-workbox-pwa/dist/sw.js"
};
Where:
globDirectorytellsWorkboxwhere to look for files to be cached for offline usage, in our case, it will be ourdotnet publishoutput folder.globPatternsdescribe the pattern to find all the files to cache such ashtml,css,jsand other assets, but alsowasmanddllbecause we are running a mono webassembly app :)- and
swDestto tell where to put the generated Service Workersw.jsfile, in our case next to our other files in the output folder.
Note: there are other options available for the config.file. You can have more information on the official documentation
Lastly, we will need to add a reference to our generated Service Worker in our index.html by adding the following lines at the end of our <body> tag:
<script>
    // Check that service workers are supported
    if ('serviceWorker' in navigator) {
        // Use the window load event to keep the page load performant
        window.addEventListener('load', () => {
            navigator.serviceWorker.register('/sw.js');
        });
    }
</script>
Finally to generate our production package, we just need to run the following command lines:
dotnet publish -c Release
workbox generateSW workbox-config.js
Host your production package into your favourite hosting service (more examples here)…
Et voilà! We get a fully running Blazor PWA installable with offline support!

Notice that despite the network being set to offline, we can still play with our application!
One more final check, let’s inspect our app in Chrome Lighthouse
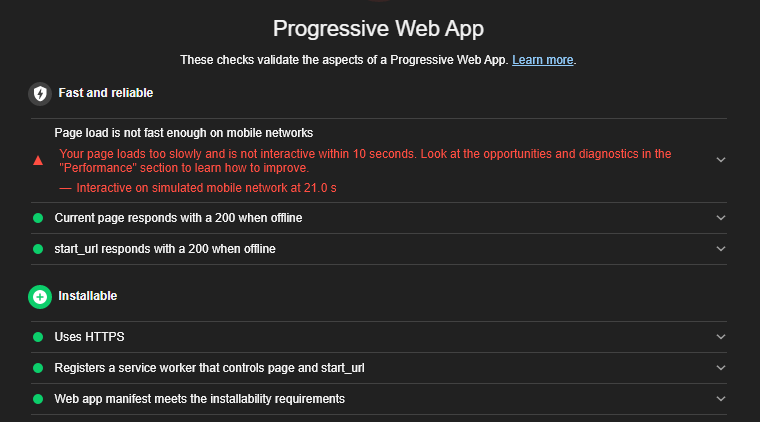
Not bad for a start in so few lines of code :)
In conclusion
I hope this article gave you a nice overview of the possibilities of transforming your Blazor app into a nice PWA using Workbox.
I have also set up a small working Github repository named blazor-workbox-pwa if you want to have a more concrete example.
Feel free to reach me out on Twitter @vivienfabing or anywhere else, and may the code be with you!